LLVM 安装与学习
前段时间研究了一下虚假控制流的源代码和魔改,感觉自己对llvm这块理解不太够,故返回来学一下,为后面学习llvm相关的混淆做铺垫。
安装
笔者环境
Ubuntu 22.04.4 LTS
LLVM 12.0.1
Cmake 3.22.1
先下载两个压缩包
https://github.com/llvm/llvm-project/releases/download/llvmorg-12.0.1/llvm-12.0.1.src.tar.xz
https://github.com/llvm/llvm-project/releases/download/llvmorg-12.0.1/clang-12.0.1.src.tar.xz
新建一个目录,例如 llvm

然后在这个目录解压上面这俩压缩包,并改名为clang和llvm
然后在build里面打开终端
cmake -G "Unix Makefiles" -DLLVM_ENABLE_PROJECTS="clang" -DCMAKE_BUILD_TYPE=Release -DLLVM_TARGETS_TO_BUILD="X86" -DBUILD_SHARED_LIBS=On ../llvm
make
make install
时间很长 等一下
学习
介绍
在我的理解里面LLVM其实不能算作是一个编译器,而是一个编译器的开发框架,先来看一下传统编译器的编译过程
高级语言 —>IR —>机器代码
层次也就是
前端 中端 后端
传统编译器例如gcc,没有办法去操作IR,导致大量的信息耦合在了一起,以至于gcc这个编译器很难去支持新的语言或者架构。
而LLVM最大的特点对我来讲是让这个中间语言IR更好地被操作,这是一种与源高级语言和最后机器代码运行环境完全不相关的一个通用的中间表示,所以如果要进行新的语言的开发,可以以模块化的思维对特定的编译部分再开发就完事了。
如下是Clang 这就是基于LLVM的编译器驱动
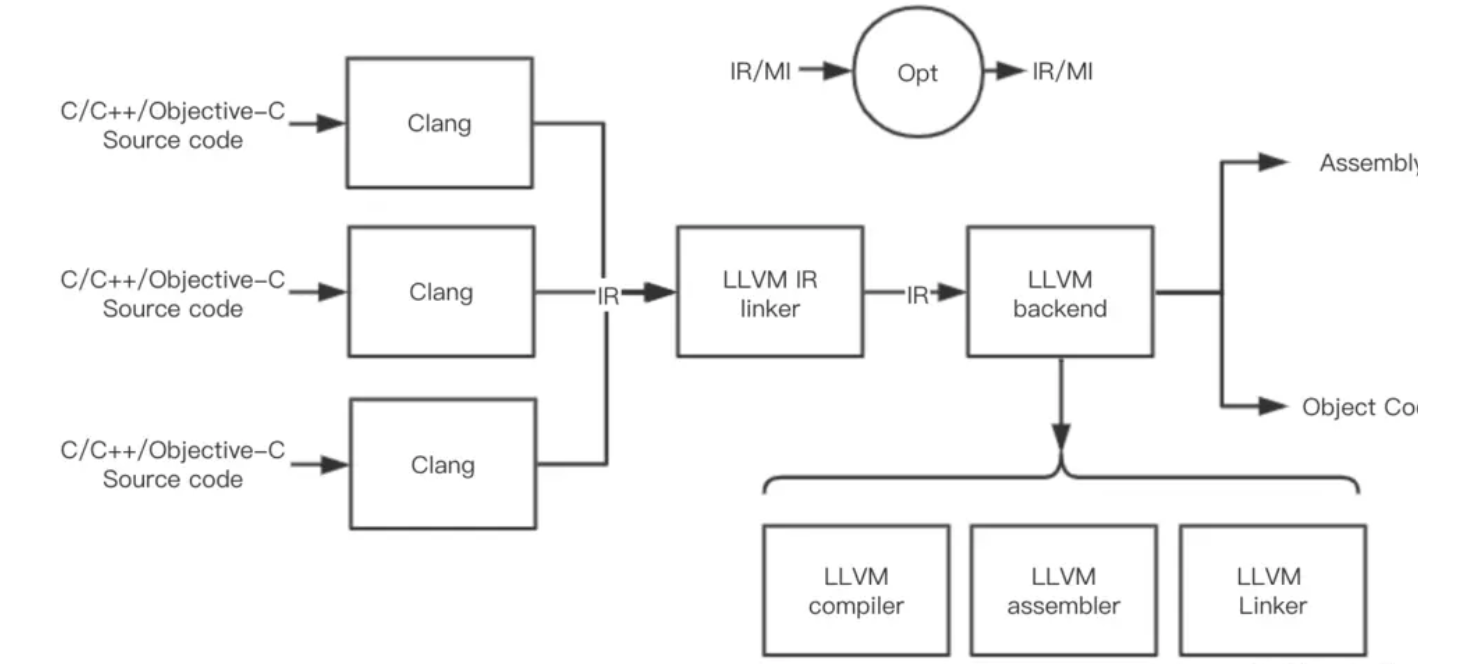
IR
这是在我眼中LLVM的核心
他有三种表现形式(呃呃,其实不能很确定是不是IR的表现形式,但是我认为这至少和IR强相关)
.ll 这是一种文本形式 后面打开来看看 可读性还是可以的
.bc 这是一种不可读的二进制IR bitcode
内存表示 只保存在内存中 没啥格式和文件后缀
两个指令来将ll和bc相互转换
llvm-as ll->bc
llvm-dis bc->ll
as和dis 有点像assemble?也可以理解成当成汇编和机器代码的关系吧。
编译成IR之后 如下结构

对照到我们之后编译出来的ll来看
头部信息
头部信息包含程序的目标平台,如x86,ARM等以及一些其他信息。

全局符号
包含函数定义、函数声明以及全局变量,
函数
表示源代码中的某个函数,这两个“函数”基本上是同一个概念。参数就是函数的参数

基本块
数由若干个基本块组成,其中函数最先执行的基本块为函数的入口块。入口块可以跳转到其他的基本块进行执行。
关于基本块,一个基本块由若干个指令和标签组成,在正常情况下,基本块的最后一条指令为跳转指令(IR中的br或者switch指令),或者返回指令(retn,和c中的return差不多)。这一类指令也叫终结指令(Terminator Instruction)。
关于基本块的分割 会再开一个博客作学习
另外 新的函数和基本块
参考
LLVM IR是学代码混淆的基础,例如:
- 以函数为基本单位的混淆:控制流平坦化
- 以基本块为基本单位的混淆:虚假控制流
- 以指令为基本单位的混淆:指令替代
至于命令 可以看
https://www.cnblogs.com/Here-is-SG/p/16708170.html
有很好的命令解读
手动编译一个项目
一个简单的hello world
#include <cstdio>
void Hello()
{
	printf("Hello, World!\n");
	return;
}
int main()
{
	Hello();
	return 0;
}
对其
clang -S -emit-llvm hello.cpp -o hello.ll

-s -> .ll
有如下.ll文件 可读性还是不错的
; ModuleID = 'hello.cpp'
source_filename = "hello.cpp"
target datalayout = "e-m:e-i64:64-f80:128-n8:16:32:64-S128"
target triple = "x86_64-unknown-linux-gnu"
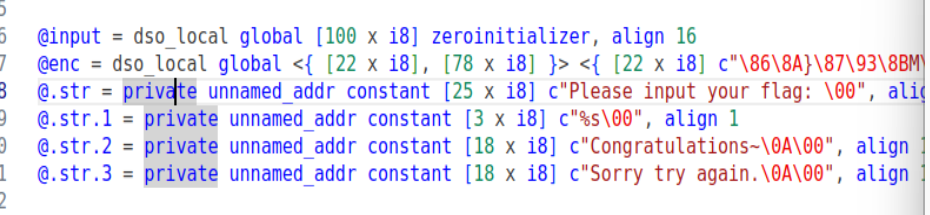
@.str = private unnamed_addr constant [15 x i8] c"Hello, World!\0A\00", align 1
; Function Attrs: noinline uwtable
define void @_Z5Hellov() #0 {
%1 = call i32 (i8*, ...) @printf(i8* getelementptr inbounds ([15 x i8], [15 x i8]* @.str, i32 0, i32 0))
ret void
}
declare i32 @printf(i8*, ...) #1
; Function Attrs: noinline norecurse uwtable
define i32 @main() #2 {
%1 = alloca i32, align 4
store i32 0, i32* %1, align 4
call void @_Z5Hellov()
ret i32 0
}
attributes #0 = { noinline uwtable "correctly-rounded-divide-sqrt-fp-math"="false" "disable-tail-calls"="false" "less-precise-fpmad"="false" "no-frame-pointer-elim"="true" "no-frame-pointer-elim-non-leaf" "no-infs-fp-math"="false" "no-jump-tables"="false" "no-nans-fp-math"="false" "no-signed-zeros-fp-math"="false" "no-trapping-math"="false" "stack-protector-buffer-size"="8" "target-cpu"="x86-64" "target-features"="+fxsr,+mmx,+sse,+sse2,+x87" "unsafe-fp-math"="false" "use-soft-float"="false" }
attributes #1 = { "correctly-rounded-divide-sqrt-fp-math"="false" "disable-tail-calls"="false" "less-precise-fpmad"="false" "no-frame-pointer-elim"="true" "no-frame-pointer-elim-non-leaf" "no-infs-fp-math"="false" "no-nans-fp-math"="false" "no-signed-zeros-fp-math"="false" "no-trapping-math"="false" "stack-protector-buffer-size"="8" "target-cpu"="x86-64" "target-features"="+fxsr,+mmx,+sse,+sse2,+x87" "unsafe-fp-math"="false" "use-soft-float"="false" }
attributes #2 = { noinline norecurse uwtable "correctly-rounded-divide-sqrt-fp-math"="false" "disable-tail-calls"="false" "less-precise-fpmad"="false" "no-frame-pointer-elim"="true" "no-frame-pointer-elim-non-leaf" "no-infs-fp-math"="false" "no-jump-tables"="false" "no-nans-fp-math"="false" "no-signed-zeros-fp-math"="false" "no-trapping-math"="false" "stack-protector-buffer-size"="8" "target-cpu"="x86-64" "target-features"="+fxsr,+mmx,+sse,+sse2,+x87" "unsafe-fp-math"="false" "use-soft-float"="false" }
!llvm.ident = !{!0}
!0 = !{!"Obfuscator-LLVM clang version 4.0.1 (based on Obfuscator-LLVM 4.0.1)"}
再是bc
clang -c -emit-llvm hello.cpp -o hello.bc

-c -> bc
就看不懂了

然后在用opt对IR进行优化
opt -load 。../(位置)LLVMObfuscator.so -hlw -S hello.ll -o hello_opt.ll
优化后的IR
; ModuleID = 'hello.ll'
source_filename = "hello.cpp"
target datalayout = "e-m:e-i64:64-f80:128-n8:16:32:64-S128"
target triple = "x86_64-unknown-linux-gnu"

@.str = private unnamed_addr constant [15 x i8] c"Hello, World!\0A\00", align 1

; Function Attrs: noinline uwtable
define void @_Z5Hellov() #0 {
  %1 = call i32 (i8*, ...) @printf(i8* getelementptr inbounds ([15 x i8], [15 x i8]* @.str, i32 0, i32 0))
  ret void
}

declare i32 @printf(i8*, ...) #1

; Function Attrs: noinline norecurse uwtable
define i32 @main() #2 {
  %1 = alloca i32, align 4
  store i32 0, i32* %1, align 4
  call void @_Z5Hellov()
  ret i32 0
}

attributes #0 = { noinline uwtable "correctly-rounded-divide-sqrt-fp-math"="false" "disable-tail-calls"="false" "less-precise-fpmad"="false" "no-frame-pointer-elim"="true" "no-frame-pointer-elim-non-leaf" "no-infs-fp-math"="false" "no-jump-tables"="false" "no-nans-fp-math"="false" "no-signed-zeros-fp-math"="false" "no-trapping-math"="false" "stack-protector-buffer-size"="8" "target-cpu"="x86-64" "target-features"="+fxsr,+mmx,+sse,+sse2,+x87" "unsafe-fp-math"="false" "use-soft-float"="false" }
attributes #1 = { "correctly-rounded-divide-sqrt-fp-math"="false" "disable-tail-calls"="false" "less-precise-fpmad"="false" "no-frame-pointer-elim"="true" "no-frame-pointer-elim-non-leaf" "no-infs-fp-math"="false" "no-nans-fp-math"="false" "no-signed-zeros-fp-math"="false" "no-trapping-math"="false" "stack-protector-buffer-size"="8" "target-cpu"="x86-64" "target-features"="+fxsr,+mmx,+sse,+sse2,+x87" "unsafe-fp-math"="false" "use-soft-float"="false" }
attributes #2 = { noinline norecurse uwtable "correctly-rounded-divide-sqrt-fp-math"="false" "disable-tail-calls"="false" "less-precise-fpmad"="false" "no-frame-pointer-elim"="true" "no-frame-pointer-elim-non-leaf" "no-infs-fp-math"="false" "no-jump-tables"="false" "no-nans-fp-math"="false" "no-signed-zeros-fp-math"="false" "no-trapping-math"="false" "stack-protector-buffer-size"="8" "target-cpu"="x86-64" "target-features"="+fxsr,+mmx,+sse,+sse2,+x87" "unsafe-fp-math"="false" "use-soft-float"="false" }

!llvm.ident = !{!0}

!0 = !{!"Obfuscator-LLVM clang version 4.0.1  (based on Obfuscator-LLVM 4.0.1)"}
(不知道是不是因为我用的后面自写的pass,导致没啥优化)
然后clang
clang hello_opt.ll -o hello

ok
pass
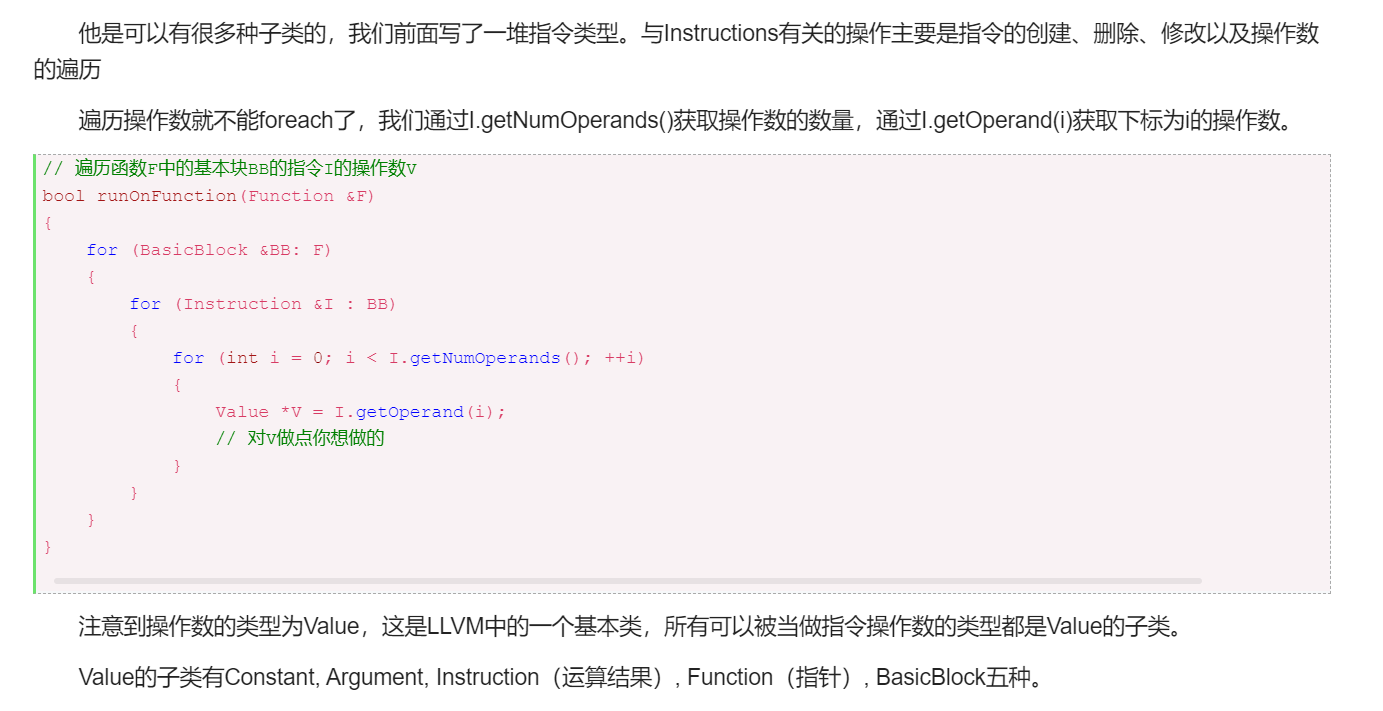
这是LLVM提供给用户用来对IR操作的一个框架,也是我们写混淆工具的一个基础。
在我们自己写的pass编译之后,使用opt进行加载,加载之后按照我们的优化或者混淆规则对中间代码IR进行修改,其中有大量pass提供的api,后面会学到。
../(位置)LLVMObfuscator.so -hlw

写一个pass玩玩
llvm提供了许多种的pass,其中有 ModulePass(基于模块)、FuncitonPass(基于函数)、CallGraphPass(基于调用图)、LoopPass(基于循环)等。
这边写的还是基于函数的吧,后面的混淆是基于他的。
FunctionPass以函数为单位,子类必须实现runOnFunction这个函数,并且pass加载执行的时候会对每一个函数进行一边runOnFunction
如何编写pass呢
创建一个类 继承FunctionPass父类
创建的类中实现runOnFunction函数
向LLVM注册我们的Pass类
创建项目需要如下的一个目录结构
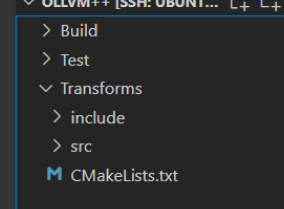
project(OLLVM++) # 指定了项目的名称
cmake_minimum_required(VERSION 3.13.4) # llvm最低要求是3.13.4
find_package(LLVM REQUIRED CONFIG)

list(APPEND CMAKE_MODULE_PATH "${LLVM_CMAKE_DIR}")
include(AddLLVM) # 上面是和环境有关的一些配置
include_directories("./include") # 指定项目的包含文件夹,后续可以导入该文件夹的头文件

separate_arguments(LLVM_DEFINITIONS_LIST NATIVE_COMMAND ${LLVM_DEFINITIONS})
add_definitions(${LLVM_DEFINITIONS_LIST})
include_directories(${LLVM_INCLUDE_DIRS}) # 配置项

#link_libraries("libLLVMTransformUtils.so")

add_llvm_library( LLVMObfuscator MODULE # 向llvm中注册一个叫LLVMObfuscator的.so文件
  src/HelloWorld.cpp # 这个就是Pass的源代码
)
然后开始
我们现在在src里面创建一个cpp 我偷懒 就1.cpp
里面的内容
#include "llvm/Pass.h"
#include "llvm/IR/Function.h"
#include "llvm/Support/raw_ostream.h"

using namespace llvm;

namespace {

    class HelloWorld : public FunctionPass{
        public:
            static char ID;
            HelloWorld() : FunctionPass(ID) {}

            bool runOnFunction(Function &F);
    };

}


bool HelloWorld::runOnFunction(Function &F){
	outs() << "Hello, " << F.getName() << "\n";
    // outs()获取整个输出流,和cout差不多
    // F.getName()获取函数名称
    // 如果后续我们自己要用pass 就在这里面写
}

char HelloWorld::ID = 0; // 初始化ID

static RegisterPass<HelloWorld> X("hlw", "My first line of LLVM Pass.");
// 向LLVM注册我们的Pass
// 前面一个变量是LLVM Pass的参数(opt的时候用他来指定),后面一个是对该参数的描述
如上我们这个pass就叫做hlw了
cd ./Build
cmake ../Transforms
make
cd ../Test
编译出来之后
对我们的.ll文件
opt -load ../Build/LLVMObfuscator.so -hlw -S xx.ll -o xx_hlw.ll


我们这个pass在编译的时候输出hello 加函数名 大概就是这样的
使用pass实现一个插桩
具体的函数实现
#include <stdio.h>
#include <stdlib.h>

int main(int argc, const char** argv) {
    char *s=NULL;
    printf("LLVM Test posix_memalign\n");
    posix_memalign((void **)&s, 16, 1024);
    printf("====== Finish ======\n");
    return 0;
}
pass实现插桩
#include "llvm/IR/Function.h"
#include "llvm/IR/IRBuilder.h"
#include "llvm/IR/InstrTypes.h"
#include "llvm/IR/LegacyPassManager.h"
#include "llvm/IR/Module.h"
#include "llvm/IR/TypeFinder.h"
#include "llvm/Pass.h"
#include "llvm/Support/raw_ostream.h"
#include "llvm/Transforms/IPO/PassManagerBuilder.h"
#include "llvm/Transforms/Utils/BasicBlockUtils.h"
using namespace llvm;
namespace {
struct SkeletonPass : public FunctionPass {
static char ID;
SkeletonPass() : FunctionPass(ID) {}
virtual bool runOnFunction(Function& F) {
// 获取函数上下文
LLVMContext& Ctx = F.getContext();
// 定义插桩函数原型, 参数类型+返回类型+插桩函数
Type* retType = Type::getVoidTy(Ctx);
std::vector<Type*> rt_posix_memalign_param_types = {
Type::getHalfPtrTy(Ctx), Type::getInt32Ty(Ctx), Type::getInt32Ty(Ctx)};
FunctionType* rt_posix_memalign_type =
FunctionType::get(retType, rt_posix_memalign_param_types, false);
FunctionCallee rt_posix_memalign = F.getParent()->getOrInsertFunction(
"rt_posix_memalign", rt_posix_memalign_type);
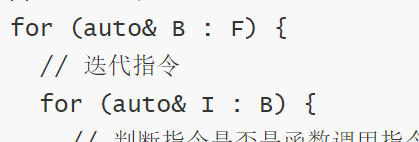
// 迭代基本块
for (auto& B : F) {
// 迭代指令
for (auto& I : B) {
// 判断指令是否是函数调用指令 CallInst
if (auto* call = dyn_cast<CallInst>(&I)) {
// 获取被调用的函数
Function* fun = call->getCalledFunction();
if (!fun) {
continue;
}
// 判断函数是否为指定名称函数
if (0 == fun->getName().compare(StringRef("posix_memalign"))) {
// 创建 IRBuilder, 用于 IR 指令构建
IRBuilder<> builder(call);
// 设置插桩点, 在当前指令前插桩
builder.SetInsertPoint(&B, builder.GetInsertPoint());
// 设置新的插桩点
auto* call2 = dyn_cast<CallInst>(&I);
IRBuilder<> builder2(call2);
builder2.SetInsertPoint(&B, ++builder2.GetInsertPoint());
std::vector<Value*> args;
for (auto arg = call->arg_begin(); arg != call->arg_end(); ++arg) {
// 将当前调用函数 call 的参数列表推到 args 中
args.push_back(*arg);
}
// 将插桩函数插入上下文中, 分别在函数调用前后插桩
builder.CreateCall(rt_posix_memalign, args);
builder2.CreateCall(rt_posix_memalign, args);
}
}
}
}
return false;
}
};
} // namespace
char SkeletonPass::ID = 0;
static RegisterPass<SkeletonPass> X("rhpass", "Hello World Pass");
static void registerSkeletonPass(const PassManagerBuilder&,
legacy::PassManagerBase& PM) {
PM.add(new SkeletonPass());
}
static RegisterStandardPasses RegisterMyPass(
PassManagerBuilder::EP_EarlyAsPossible,
registerSkeletonPass);
其中的核心的逻辑在这里
迭代函数中的每一条指令
之前说过 runonfunction会在每个函数调用时运行一次的
用循环迭代指令
判断当前指令是否为 LLVM IR 的 call 指令, 这样的指令为函数调用指令

判断被调用的函数名是否为 posix_memalign

函数中被call的函数是不是posix_memalign
如果是, 定位当前 call 指令的前后位置, 并将构造好的函数 rt_posix_memalign 插入当前指令前后
就有了

先获取上下文,函数类型,形参列表,然后给到builder,插入到上下文当中
关键API
里面用到了一些比较关键的API 放在一块说
//// F <- LLVM::Function
//// 获取上下文环境
LLVMContext& Ctx = F.getContext();
//// 定义插桩函数原型, 参数类型+返回类型+插桩函数
// 定义返回值类型
Type* retType = Type::getVoidTy(Ctx);
// 定义形参类型
std::vector<Type*> rt_posix_memalign_param_types = {
    Type::getHalfPtrTy(Ctx), Type::getInt32Ty(Ctx), Type::getInt32Ty(Ctx)};
// 定义函数类型(函数声明, 函数指针原型)
FunctionType* rt_posix_memalign_type =
    FunctionType::get(retType, rt_posix_memalign_param_types, false);
// 构建函数原型
FunctionCallee rt_posix_memalign = F.getParent()->getOrInsertFunction(
    "rt_posix_memalign", rt_posix_memalign_type);
call
//// I <- LLVM::Instruction
//// 尝试将指令转换为 call 指令原型
auto* call = dyn_cast<CallInst>(&I);
//// 获取 call 调用的函数 f
Function* f = call->getCalledFunction();
//// 判断函数名是否与特定字符串匹配
if (0 == fun->getName().compare(StringRef("posix_memalign"))) {
    // 创建一个向量, 用于存储函数调用时的参数
    std::vector<Value*> args;
    // 迭代参数, 从call->arg_begin()到call->arg_end(), 迭代参数本身
    for (auto arg = call->arg_begin(); arg != call->arg_end(); ++arg) {
        // 将当前调用函数 call 的参数列表推到 args 中
        args.push_back(*arg);
    }
}
builder
//// 创建 IRBuilder, 用于 IR 指令构建
IRBuilder<> builder(call);
//// 设置插桩点, 在当前位置插桩, 后续内容会向后移动
builder.SetInsertPoint(&B, builder.GetInsertPoint());
// 如果需要在下一行插桩
// builder.SetInsertPoint(&B, ++builder2.GetInsertPoint());
//// 插入一条 call 指令, 传入函数原型与参数列表
builder.CreateCall(rt_posix_memalign, args);

本篇博客很多学习了下面这篇博客的内容,写的非常好,实践价值很高。
https://www.cnblogs.com/Here-is-SG/p/16708170.html