OK来到第二部分,打算给到系统启动流程,还是很重要的,网上也有不少资料可以参考,可以结合起来再加上源码一起学习。
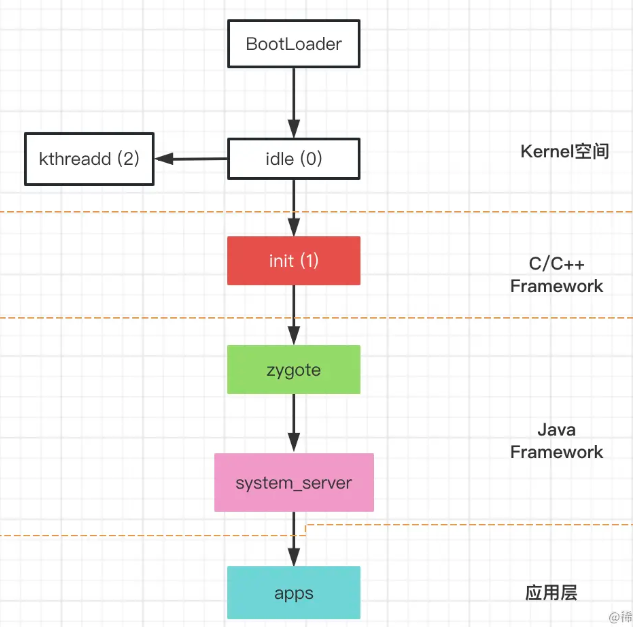
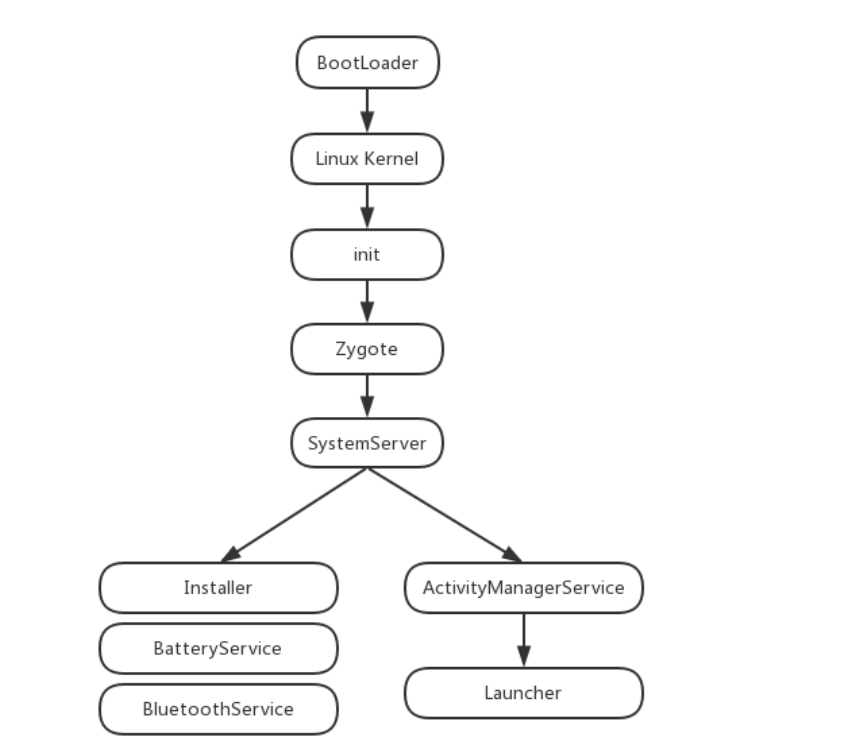
先来一个总览
1.启动电源
按下电源之后,引导芯片代码从预定义的地方开始执行(硬件写死的一个位置)开始执行,加载Bootloader到RAM,开始执行。
2.Bootloader程序
在Android操作系统开始前的一个程序,主要作用把系统OS给拉起
这一块经常root的朋友应该接触的比较多,我对这个研究比较浅,但是冲浪的时候看到了一个比较有趣比较猛的Bootloader破解的方式
https://www.4hou.com/posts/5VBq
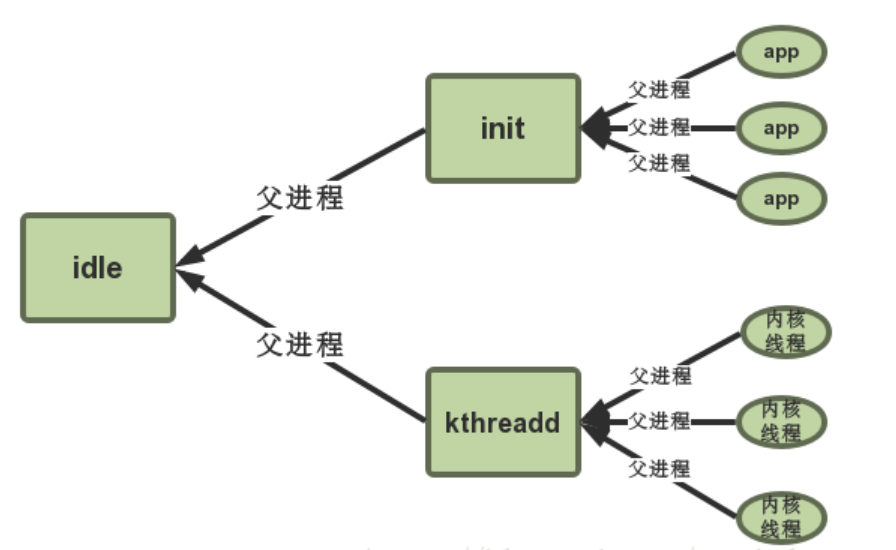
3.idle进程(内核空间)
之前看权威指南的时候,没有写到这里的这个内核空间的一个进程,但实际上这才是第一个进程,这个进程是在内核空间做初始化的,和启动init进程的。
可以参考一下这个帖子
https://blog.csdn.net/marshal_zsx/article/details/80225854
4.init进程
由上init进程是由内核空间启动的,里面有这样一段代码
if (!try_to_run_init_process("/sbin/init") ||
	    !try_to_run_init_process("/etc/init") ||
	    !try_to_run_init_process("/bin/init") ||
	    !try_to_run_init_process("/bin/sh"))
		return 0;
需要关心的就是这里的init,文件在system/bin/init
根据mk文件我们可以看到它是如何编译出来的
D:\android-7.0.0_r1\system\core\init\Android.mk
LOCAL_SRC_FILES:= \
    bootchart.cpp \
    builtins.cpp \
    devices.cpp \
    init.cpp \
    keychords.cpp \
    property_service.cpp \
    signal_handler.cpp \
    ueventd.cpp \
    ueventd_parser.cpp \
    watchdogd.cpp \
可以看到这里的这个init.cpp
4.1 init.cpp
main主要的逻辑不是很长
int main(int argc, char** argv) {
    if (!strcmp(basename(argv[0]), "ueventd")) {
        return ueventd_main(argc, argv);
    }

    if (!strcmp(basename(argv[0]), "watchdogd")) {
        return watchdogd_main(argc, argv);
    }

    // Clear the umask.
    umask(0);

    add_environment("PATH", _PATH_DEFPATH);

    bool is_first_stage = (argc == 1) || (strcmp(argv[1], "--second-stage") != 0);

    // Get the basic filesystem setup we need put together in the initramdisk
    // on / and then we'll let the rc file figure out the rest.
    // 这里是挂载上文件系统
    if (is_first_stage) {
        mount("tmpfs", "/dev", "tmpfs", MS_NOSUID, "mode=0755");
        mkdir("/dev/pts", 0755);
        mkdir("/dev/socket", 0755);
        mount("devpts", "/dev/pts", "devpts", 0, NULL);
        #define MAKE_STR(x) __STRING(x)
        mount("proc", "/proc", "proc", 0, "hidepid=2,gid=" MAKE_STR(AID_READPROC));
        mount("sysfs", "/sys", "sysfs", 0, NULL);
    }

    // We must have some place other than / to create the device nodes for
    // kmsg and null, otherwise we won't be able to remount / read-only
    // later on. Now that tmpfs is mounted on /dev, we can actually talk
    // to the outside world.
    open_devnull_stdio();
    klog_init();
    klog_set_level(KLOG_NOTICE_LEVEL);

    NOTICE("init %s started!\n", is_first_stage ? "first stage" : "second stage");

    if (!is_first_stage) {
        // Indicate that booting is in progress to background fw loaders, etc.
        close(open("/dev/.booting", O_WRONLY | O_CREAT | O_CLOEXEC, 0000));
		// 初始化属性
        property_init();

        // If arguments are passed both on the command line and in DT,
        // properties set in DT always have priority over the command-line ones.
        process_kernel_dt();
        process_kernel_cmdline();

        // Propagate the kernel variables to internal variables
        // used by init as well as the current required properties.
        export_kernel_boot_props();
    }

    // Set up SELinux, including loading the SELinux policy if we're in the kernel domain.
    selinux_initialize(is_first_stage);

    // If we're in the kernel domain, re-exec init to transition to the init domain now
    // that the SELinux policy has been loaded.
    if (is_first_stage) {
        if (restorecon("/init") == -1) {
            ERROR("restorecon failed: %s\n", strerror(errno));
            security_failure();
        }
        char* path = argv[0];
        char* args[] = { path, const_cast<char*>("--second-stage"), nullptr };
        if (execv(path, args) == -1) {
            ERROR("execv(\"%s\") failed: %s\n", path, strerror(errno));
            security_failure();
        }
    }

    // These directories were necessarily created before initial policy load
    // and therefore need their security context restored to the proper value.
    // This must happen before /dev is populated by ueventd.
    NOTICE("Running restorecon...\n");
    restorecon("/dev");
    restorecon("/dev/socket");
    restorecon("/dev/__properties__");
    restorecon("/property_contexts");
    restorecon_recursive("/sys");

    epoll_fd = epoll_create1(EPOLL_CLOEXEC);
    if (epoll_fd == -1) {
        ERROR("epoll_create1 failed: %s\n", strerror(errno));
        exit(1);
    }

    signal_handler_init();

    property_load_boot_defaults();
    export_oem_lock_status();
    start_property_service();

    const BuiltinFunctionMap function_map;
    Action::set_function_map(&function_map);
	//在这里建立一个parser对象 开始解析init.rc
    Parser& parser = Parser::GetInstance();
    parser.AddSectionParser("service",std::make_unique<ServiceParser>());
    parser.AddSectionParser("on", std::make_unique<ActionParser>());
    parser.AddSectionParser("import", std::make_unique<ImportParser>());
    parser.ParseConfig("/init.rc");

    ActionManager& am = ActionManager::GetInstance();

    am.QueueEventTrigger("early-init");

    // Queue an action that waits for coldboot done so we know ueventd has set up all of /dev...
    am.QueueBuiltinAction(wait_for_coldboot_done_action, "wait_for_coldboot_done");
    // ... so that we can start queuing up actions that require stuff from /dev.
    am.QueueBuiltinAction(mix_hwrng_into_linux_rng_action, "mix_hwrng_into_linux_rng");
    am.QueueBuiltinAction(set_mmap_rnd_bits_action, "set_mmap_rnd_bits");
    am.QueueBuiltinAction(keychord_init_action, "keychord_init");
    am.QueueBuiltinAction(console_init_action, "console_init");

    // Trigger all the boot actions to get us started.
    am.QueueEventTrigger("init");

    // Repeat mix_hwrng_into_linux_rng in case /dev/hw_random or /dev/random
    // wasn't ready immediately after wait_for_coldboot_done
    am.QueueBuiltinAction(mix_hwrng_into_linux_rng_action, "mix_hwrng_into_linux_rng");

    // Don't mount filesystems or start core system services in charger mode.
    std::string bootmode = property_get("ro.bootmode");
    if (bootmode == "charger") {
        am.QueueEventTrigger("charger");
    } else {
        am.QueueEventTrigger("late-init");
    }

    // Run all property triggers based on current state of the properties.
    am.QueueBuiltinAction(queue_property_triggers_action, "queue_property_triggers");

    while (true) {
        if (!waiting_for_exec) {
            am.ExecuteOneCommand();
            restart_processes();
        }

        int timeout = -1;
        if (process_needs_restart) {
            timeout = (process_needs_restart - gettime()) * 1000;
            if (timeout < 0)
                timeout = 0;
        }

        if (am.HasMoreCommands()) {
            timeout = 0;
        }

        bootchart_sample(&timeout);

        epoll_event ev;
        int nr = TEMP_FAILURE_RETRY(epoll_wait(epoll_fd, &ev, 1, timeout));
        if (nr == -1) {
            ERROR("epoll_wait failed: %s\n", strerror(errno));
        } else if (nr == 1) {
            ((void (*)()) ev.data.ptr)();
        }
    }

    return 0;
}
其实Android7.0我看的这个版本init.cpp的main还是比较简单的,到后面Android10代码结构变了一些,将first stage,second stage,解析的代码全都封装进别的函数了,对分析者来说可能更好懂一些吧。
做一下总结,init这个进程做了什么在init.cpp可以看个大概
- 挂载文件 or 创建文件
- 初始化操作(例如umask(0),进行权限设置等)
- setlinux linux相关安全策略
- 解析init.rc
4.2 init.rc
这一块稍微有点搞,按照正常流程走的话,里面就到了要开始准备进入zygote相关的逻辑了。
因为Android稍高一些的逻辑是如下这样,可以找到start zygote字样
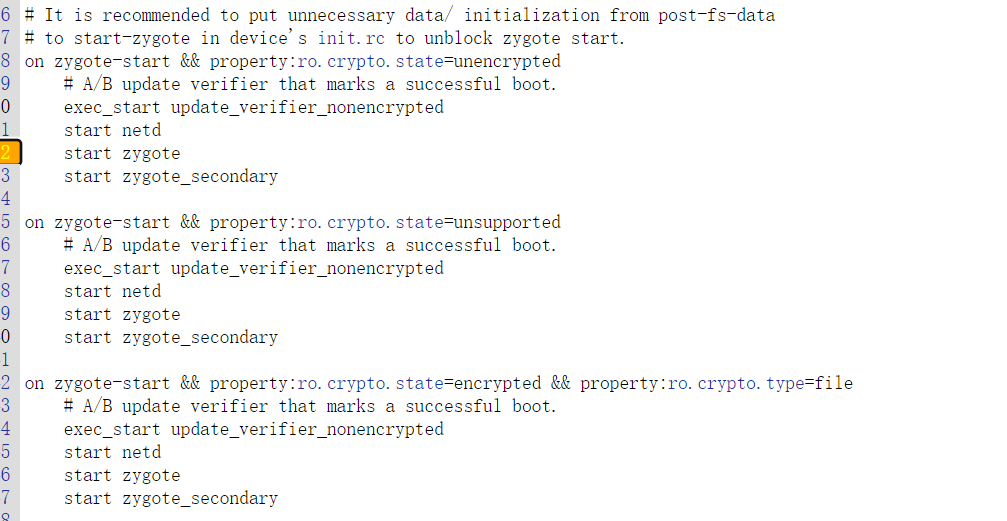
但对于Android7.0版本
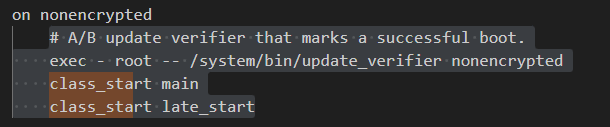
所以暂时刚开始来到这里的时候其实还是去研究了一下的,先说一下,是这里 class_start main 进行启动的
要知道他怎么启动的,需要掌握一些rc的AIL文件和Parser如何解析init.rc相关知识。
4.2.1 AIL语言
Android Init Language 安卓初始化语言,这一块本人了解不深,研究启动流程也不需要太深理解,所以大概看一下就选(我写的有点啰嗦)
主要有五类语句,Actions、Commands、Services、Options、Imports
Actions、Services、Import可以确定一个Section,如下是一个section
on boot
    ifup lo
    hostname localhost
    domainname localdomain
4.2.1.1 Action
格式
后面会包含一个trigger触发器 表明何是执行这个Action
on <trgger> [&& <trigger>]*
   <command>
   <command>
   <command>
   ...
4.2.1.2 Commands
简单来讲就是要执行的命令
| 命令 | 解释 |
|---|---|
bootchart_init |
如果配置了bootcharing,则启动.包含在默认的init.rc中 |
chmod |
更改文件权限 |
chown <owner> <group> <path> |
更改文件的所有者和组 |
calss_start <serviceclass> |
启动指定类别服务下的所有未启动的服务 |
class_stop <serviceclass> |
停止指定类别服务类下的所有已运行的服务 |
class_reset <serviceclass> |
停止指定类别的所有服务(服务还在运行),但不会禁用这些服务.后面可以通过class_start重启这些服务 |
copy <src> <dst> |
复制文件,对二进制/大文件非常有用 |
domainname <name> |
设置域名称 |
enable <servicename> |
启用已经禁用的服务 |
exec [ <seclabel> [ <user> [ <group> ]* ]] --<command> [ <argument> ]* |
fork一个进程执行指定命令,如果有参数,则带参数执行 |
export <name> |
在全局环境中,将<name>变量的值设置为<value>,即以键值对的方式设置全局环境变量.这些变量对之后的任何进程都有效 |
hostname |
设置主机名 |
ifup <interface> |
启动某个网络接口 |
insmod [-f] <path> [<options>] |
加载指定路径下的驱动模块。-f强制加载,即不管当前模块是否和linux kernel匹配 |
load_all_props |
从/system,/vendor加载属性。默认包含在init.rc |
load_persist_props |
当/data被加密时,加载固定属性 |
loglevel <level> |
设置kernel日志等级 |
mkdir <path> [mode] [owner] [group] |
在制定路径下创建目录 |
mount_all <fstab> [ <path> ]* |
在给定的fs_mgr-format上调用fs_mgr_mount和引入rc文件 |
mount <type> <device> <dir>[ <flag> ]* [<options>] |
挂载指定设备到指定目录下. |
powerct |
用来应对sys.powerctl中系统属性的变化,用于系统重启 |
restart <service> |
重启制定服务,但不会禁用该服务 |
restorecon <path> [ <path> ]* |
恢复指定文件到file_contexts配置中指定的安全上线文环境 |
restorecon_recursive <path> [ <path> ]* |
以递归的方式恢复指定目录到file_contexts配置中指定的安全上下文中 |
rm <path> |
删除指定路径下的文件 |
rmdir <path> |
删除制定路径下的目录 |
setprop <name> <value> |
将系统属性<name>的值设置为<value>,即以键值对的方式设置系统属性 |
setrlimit <resource> <cur> <max> |
设置资源限制 |
start <service> |
启动服务(如果该服务还未启动) |
stop <service> |
关闭服务(如果该服务还未停止) |
swapon_all <fstab> |
|
symlink <target> <path> |
创建一个指向<path>的符合链接<target> |
sysclktz <mins_west_of_gmt> |
设置系统时钟的基准,比如0代表GMT,即以格林尼治时间为准 |
trigger <event> |
触发一个事件,将该action排在某个action之后(用于Action排队) |
verity_load_state |
|
verity_update_state <mount_point> |
|
wait <path> [ <timeout> ] |
等待一个文件是否存在,存在时立刻返回或者超时后返回.默认超时事件是5s |
write <path> <content> |
写内容到指定文件中 |
复制自https://blog.csdn.net/w2064004678/article/details/105510821
4.2.1.3 Services
表明一些在初始化时就启动或者退出时需要重启的程序
格式
service <name> <pathname> [ <argument> ]*
        <option>
        <option>
        ...
一个例子
service ueventd /sbin/ueventd
    class core
    critical
    seclabel u:r:ueventd:s0
4.2.1.4 Options
是用来修饰服务的,告诉服务要怎么进行运行
| 选项 | 解释 |
|---|---|
console |
服务需要一个控制台. |
critical |
表示这是一个关键设备服务.如果4分钟内此服务退出4次以上,那么这个设备将重启进入recovery模式 |
disabled |
服务不会自动启动,必须通过服务名显式启动 |
setenv <name> <value> |
在进程启动过程中,将环境变量<name>的值设置为<value>,即以键值对的方式设置环境变量 |
socket <name> <type> <perm> [ <user> [ <group> [seclabel]]] |
创建一个unix域下的socket,其被命名/dev/socket/<name>. 并将其文件描述符fd返回给服务进程.其中,type必须为dgram,stream或者seqpacke,user和group默认是0.seclabel是该socket的SELLinux的安全上下文环境,默认是当前service的上下文环境,通过seclabel指定. |
user <username> |
在执行此服务之前切换用户名,当前默认的是root.自Android M开始,即使它要求linux capabilities,也应该使用该选项.很明显,为了获得该功能,进程需要以root用户运行 |
group <groupname> |
在执行此服务之前切换组名,除了第一个必须的组名外,附加的组名用于设置进程的补充组(借助setgroup()函数),当前默认的是root |
seclabel <seclabel> |
在执行该服务之前修改其安全上下文,默认是init程序的上下文 |
oneshot |
当服务退出时,不重启该服务 |
class <name> |
为当前service设定一个类别.相同类别的服务将会同时启动或者停止,默认类名是default. |
onrestart |
当服务重启时执行该命令 |
priority <priority> |
设置服务进程的优先级.优先级取值范围为-20~19,默认是0.可以通过setpriority()设置 |
4.2.1.5 Imports
引入配置文件
import <path>
例子
import /init.environ.rc
import /init.usb.rc
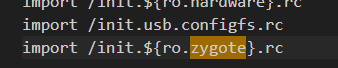
import /init.${ro.hardware}.rc
import /init.usb.configfs.rc
import /init.${ro.zygote}.rc
AIL 的介绍就到这了,如果想要详细了解请阅读 system/core/init 下的 readme.txt 文件。
4.2.2 init_parser.cpp
目光先转到init.cpp里面,下面这段代码对init.rc进行解析
    Parser& parser = Parser::GetInstance();
    parser.AddSectionParser("service",std::make_unique<ServiceParser>());
    parser.AddSectionParser("on", std::make_unique<ActionParser>());
    parser.AddSectionParser("import", std::make_unique<ImportParser>());
    parser.ParseConfig("/init.rc");
ok,这个parser是怎么写的呢,逻辑就在init_parser.cpp里面
一点点来,既然上面先调用了parser.AddSectionParser,那我们就看看这个函数
可以看到第二个参数parser被保存在以第一个参数name
为标号的section_parsers_里面,而section_parsers__是一个map集合,也就是这个函数的作用是将parser和对应的section进行绑定
void Parser::AddSectionParser(const std::string& name,
                              std::unique_ptr<SectionParser> parser) {
    section_parsers_[name] = std::move(parser);
}
其实以上操作很大意义上是在做解释器初始化的工作。
接下来看看解析的这一行parser.ParseConfig(“/init.rc”);,其中parser.ParseConfig
可以看到这个函数作用就是根据传进来的参数看是文件路径还是目录路径,目录路径就调用ParseConfigDir 进行下一步的递归,找到文件路径然后再调用ParseConfigFile
bool Parser::ParseConfig(const std::string& path) {
    if (is_dir(path.c_str())) {
        return ParseConfigDir(path);
    }
    return ParseConfigFile(path);
}


bool Parser::ParseConfigDir(const std::string& path) {
    INFO("Parsing directory %s...\n", path.c_str());
    std::unique_ptr<DIR, int(*)(DIR*)> config_dir(opendir(path.c_str()), closedir);
    if (!config_dir) {
        ERROR("Could not import directory '%s'\n", path.c_str());
        return false;
    }
    dirent* current_file;
    while ((current_file = readdir(config_dir.get()))) {
        std::string current_path =
            android::base::StringPrintf("%s/%s", path.c_str(), current_file->d_name);
        // Ignore directories and only process regular files.
        if (current_file->d_type == DT_REG) {
            if (!ParseConfigFile(current_path)) {
                ERROR("could not import file '%s'\n", current_path.c_str());
            }
        }
    }
    return true;
}
那么重点来到ParseConfigFile
可以看到下面的作用就是
- 从 rc 文件中读取内容保存在 data 中
- 调用 ParseData 进行解析
bool Parser::ParseConfigFile(const std::string& path) {
    INFO("Parsing file %s...\n", path.c_str());
    Timer t;
    std::string data;
    if (!read_file(path.c_str(), &data)) {
        return false;
    }

    data.push_back('\n'); // TODO: fix parse_config.
    ParseData(path, data);
    for (const auto& sp : section_parsers_) {
        sp.second->EndFile(path);
    }

    // Turning this on and letting the INFO logging be discarded adds 0.2s to
    // Nexus 9 boot time, so it's disabled by default.
    if (false) DumpState();

    NOTICE("(Parsing %s took %.2fs.)\n", path.c_str(), t.duration());
    return true;
}
进一步来到ParseData
代码稍长,把分析写在代码里面了
void Parser::ParseData(const std::string& filename, const std::string& data) {
    //TODO: Use a parser with const input and remove this copy
    //将 rc 中的内容保存在 vector 中便于逐个字符进行解析
    std::vector<char> data_copy(data.begin(), data.end());
    data_copy.push_back('\0');

    parse_state state;
    state.filename = filename.c_str();
    state.line = 0;
    state.ptr = &data_copy[0];
    state.nexttoken = 0;

    SectionParser* section_parser = nullptr;
    //存放每一行的内容
    std::vector<std::string> args;

    for (;;) {
        switch (next_token(&state)) {
        case T_EOF:
            if (section_parser) {
                section_parser->EndSection();
            }
            return;
        case T_NEWLINE:
            state.line++;
            //某行为空 则不进行解析
            if (args.empty()) {
                break;
            }
            // 通过判断args[0]的内容是不是services on import来判断是否是section的起始位置
            if (section_parsers_.count(args[0])) {
                if (section_parser) {
                    //结束解析
                    section_parser->EndSection();
                }
                //取出对应的解释器
                section_parser = section_parsers_[args[0]].get();
                std::string ret_err;
                //进行解析了
                if (!section_parser->ParseSection(args, &ret_err)) {
                    parse_error(&state, "%s\n", ret_err.c_str());
                    section_parser = nullptr;
                }
            } else if (section_parser) {
                //不是section起始位置的话,这行就属于是section子块,进行line解析
                std::string ret_err;
                if (!section_parser->ParseLineSection(args, state.filename,
                                                      state.line, &ret_err)) {
                    parse_error(&state, "%s\n", ret_err.c_str());
                }
            }
            args.clear();
            break;
        case T_TEXT:
            args.emplace_back(state.text);
            break;
        }
    }
}
简单来说上述函数就是通过判断,调用
- ParseSection
- ParseLineSection
- EndSection
这根据解释器的不同,逻辑也有些不同,如果你是Action,则在ActionParser ,如果service则在ServiceParser
4.2.2.1 ActionParser
action.cpp
ParseSection是创建Action对象(我理解下来就是对action的操作) 为对象添加一个触发器 并且将action_移动到目前的Action对象里面去
bool ActionParser::ParseSection(const std::vector<std::string>& args,
                                std::string* err) {
    std::vector<std::string> triggers(args.begin() + 1, args.end());
    if (triggers.size() < 1) {
        *err = "actions must have a trigger";
        return false;
    }

    auto action = std::make_unique<Action>(false);
    if (!action->InitTriggers(triggers, err)) {
        return false;
    }

    action_ = std::move(action);
    return true;
}
ParseLineSection 这个就是每一行(我理解下来就是对command的操作)
bool ActionParser::ParseLineSection(const std::vector<std::string>& args,
                                    const std::string& filename, int line,
                                    std::string* err) const {
    return action_ ? action_->AddCommand(args, filename, line, err) : false;
}
调用下面这个AddCommand
bool Action::AddCommand(const std::vector<std::string>& args,
                        const std::string& filename, int line, std::string* err) {
    if (!function_map_) {
        *err = "no function map available";
        return false;
    }

    if (args.empty()) {
        *err = "command needed, but not provided";
        return false;
    }
//这里提及了一个function_map_ 很重要
    auto function = function_map_->FindFunction(args[0], args.size() - 1, err);
    if (!function) {
        return false;
    }

    AddCommand(function, args, filename, line);
    return true;
}
在调用下面这个AddCommand
void Action::AddCommand(BuiltinFunction f,
                        const std::vector<std::string>& args,
                        const std::string& filename, int line) {
    commands_.emplace_back(f, args, filename, line);
}
根据上面的这个function_map_ 查找设置对应的command处理函数
例如启动zygote的class start,就是在这里被设置好 碰见class start的时候调用哪个函数
那具体调用哪个函数呢,继续往下看function_map_在那被复值
static const KeywordMap<BuiltinFunction>* function_map_;

static void set_function_map(const KeywordMap<BuiltinFunction>* function_map) {
    function_map_ = function_map;
}
需要再次回到init.cpp 找到下面这行
    const BuiltinFunctionMap function_map;
    Action::set_function_map(&function_map);
c下面就要找到BuiltinFunctionMap 实在builtins.cpp里面的
我们找到下面这个map
BuiltinFunctionMap::Map& BuiltinFunctionMap::map() const {
    constexpr std::size_t kMax = std::numeric_limits<std::size_t>::max();
    static const Map builtin_functions = {
        {"bootchart_init",          {0,     0,    do_bootchart_init}},
        {"chmod",                   {2,     2,    do_chmod}},
        {"chown",                   {2,     3,    do_chown}},
        {"class_reset",             {1,     1,    do_class_reset}},
        {"class_start",             {1,     1,    do_class_start}},
        {"class_stop",              {1,     1,    do_class_stop}},
        {"copy",                    {2,     2,    do_copy}},
        {"domainname",              {1,     1,    do_domainname}},
        {"enable",                  {1,     1,    do_enable}},
        {"exec",                    {1,     kMax, do_exec}},
        {"export",                  {2,     2,    do_export}},
        {"hostname",                {1,     1,    do_hostname}},
        {"ifup",                    {1,     1,    do_ifup}},
        {"init_user0",              {0,     0,    do_init_user0}},
        {"insmod",                  {1,     kMax, do_insmod}},
        {"installkey",              {1,     1,    do_installkey}},
        {"load_persist_props",      {0,     0,    do_load_persist_props}},
        {"load_system_props",       {0,     0,    do_load_system_props}},
        {"loglevel",                {1,     1,    do_loglevel}},
        {"mkdir",                   {1,     4,    do_mkdir}},
        {"mount_all",               {1,     kMax, do_mount_all}},
        {"mount",                   {3,     kMax, do_mount}},
        {"powerctl",                {1,     1,    do_powerctl}},
        {"restart",                 {1,     1,    do_restart}},
        {"restorecon",              {1,     kMax, do_restorecon}},
        {"restorecon_recursive",    {1,     kMax, do_restorecon_recursive}},
        {"rm",                      {1,     1,    do_rm}},
        {"rmdir",                   {1,     1,    do_rmdir}},
        {"setprop",                 {2,     2,    do_setprop}},
        {"setrlimit",               {3,     3,    do_setrlimit}},
        {"start",                   {1,     1,    do_start}},
        {"stop",                    {1,     1,    do_stop}},
        {"swapon_all",              {1,     1,    do_swapon_all}},
        {"symlink",                 {2,     2,    do_symlink}},
        {"sysclktz",                {1,     1,    do_sysclktz}},
        {"trigger",                 {1,     1,    do_trigger}},
        {"verity_load_state",       {0,     0,    do_verity_load_state}},
        {"verity_update_state",     {0,     0,    do_verity_update_state}},
        {"wait",                    {1,     2,    do_wait}},
        {"write",                   {2,     2,    do_write}},
    };
    return builtin_functions;
}
那class_start 对应的就是do_class_start,在builtins里面就写好了
具体的逻辑我们下面再去看,先结束掉ActionParser的ParseLineSection
再是EndSection
void ActionParser::EndSection() {
    if (action_ && action_->NumCommands() > 0) {
        ActionManager::GetInstance().AddAction(std::move(action_));
    }
}

void ActionManager::AddAction(std::unique_ptr<Action> action) {
    ...

    if (old_action_it != actions_.end()) {
        (*old_action_it)->CombineAction(*action);
    } else {
      //将解析之后的 action 对象增加到 actions_ 链表中,用于遍历执行。
        actions_.emplace_back(std::move(action));
    }
}

//ActionManager 在 action.h 中的定义
class ActionManager {
public:
    static ActionManager& GetInstance();

    void AddAction(std::unique_ptr<Action> action);
    void QueueEventTrigger(const std::string& trigger);
    void QueuePropertyTrigger(const std::string& name, const std::string& value);
    void QueueAllPropertyTriggers();
    void QueueBuiltinAction(BuiltinFunction func, const std::string& name);
    void ExecuteOneCommand();
    bool HasMoreCommands() const;
    void DumpState() const;

private:
    ActionManager();

    ActionManager(ActionManager const&) = delete;
    void operator=(ActionManager const&) = delete;

    std::vector<std::unique_ptr<Action>> actions_; //actions_ 的定义
    std::queue<std::unique_ptr<Trigger>> trigger_queue_;
    std::queue<const Action*> current_executing_actions_;
    std::size_t current_command_;
};
来总结一下解析Action的过程
- 创建一个Action对象
- 把Action对象添加Trigger 以及对应的command
- 添加command时 为command设置好对应的处理函数逻辑
- 把Action对象添加到ActionManager vector 类型的 actions_ 链表当中去
4.2.2.2 ServiceParser
起始大体逻辑和Action是很像的
bool ServiceParser::ParseSection(const std::vector<std::string>& args,
                                 std::string* err) {
    ...
  //获取服务名
    const std::string& name = args[1];
    ...
  //保存服务名外的参数(如执行路径等)
    std::vector<std::string> str_args(args.begin() + 2, args.end());
  //将 service_ 指针指向当前 Service 对象
    service_ = std::make_unique<Service>(name, "default", str_args);
    return true;
}
bool ServiceParser::ParseLineSection(const std::vector<std::string>& args,
                                     const std::string& filename, int line,
                                     std::string* err) const {
  //为 Service 中的每一个 Option 指定处理函数
    return service_ ? service_->HandleLine(args, err) : false;
}

bool Service::HandleLine(const std::vector<std::string>& args, std::string* err) {
    ...

    static const OptionHandlerMap handler_map;
  //寻找对应 option 的处理函数
    auto handler = handler_map.FindFunction(args[0], args.size() - 1, err);

    ...

    return (this->*handler)(args, err);
}
void ServiceParser::EndSection() {
    if (service_) {
        ServiceManager::GetInstance().AddService(std::move(service_));
    }
}

void ServiceManager::AddService(std::unique_ptr<Service> service) {
    Service* old_service = FindServiceByName(service->name());
    if (old_service) {
        ERROR("ignored duplicate definition of service '%s'",
              service->name().c_str());
        return;
    }
  //将解析之后 service 对象增加到 services_ 链表中
    services_.emplace_back(std::move(service));
}

//ServiceManager 在 service.h 中的定义
class ServiceManager {
public:
    static ServiceManager& GetInstance();

    void AddService(std::unique_ptr<Service> service);
    Service* MakeExecOneshotService(const std::vector<std::string>& args);
    Service* FindServiceByName(const std::string& name) const;
    Service* FindServiceByPid(pid_t pid) const;
    Service* FindServiceByKeychord(int keychord_id) const;
    void ForEachService(std::function<void(Service*)> callback) const;
    void ForEachServiceInClass(const std::string& classname,
                               void (*func)(Service* svc)) const;
    void ForEachServiceWithFlags(unsigned matchflags,
                             void (*func)(Service* svc)) const;
    void ReapAnyOutstandingChildren();
    void RemoveService(const Service& svc);
    void DumpState() const;

private:
    ServiceManager();
    bool ReapOneProcess();
    static int exec_count_; // Every service needs a unique name.
    std::vector<std::unique_ptr<Service>> services_; //services_ 的定义
};
与Action类似
- 创建Service对象 解析Service对象并把对应参数添加进去
- 为每个Option对象设置处理函数
4.2.2.3 command如何被执行
现在有了AIL的知识,和解释器如何解释每一条的command,现在设备就可以正常读取,并且管理这个init.rc文件当中的内容了(感觉还是在做初始化,还没到运行)
我们的目的是要找到如何启动zygote,那如何执行command也很重要(比如class_start main如何锁定到zygote)
回到init.cpp
while (true) {
        if (!waiting_for_exec) {
            am.ExecuteOneCommand();
            restart_processes();
        }

        int timeout = -1;
        if (process_needs_restart) {
            timeout = (process_needs_restart - gettime()) * 1000;
            if (timeout < 0)
                timeout = 0;
        }

        if (am.HasMoreCommands()) {
            timeout = 0;
        }

        bootchart_sample(&timeout);

        epoll_event ev;
        int nr = TEMP_FAILURE_RETRY(epoll_wait(epoll_fd, &ev, 1, timeout));
        if (nr == -1) {
            ERROR("epoll_wait failed: %s\n", strerror(errno));
        } else if (nr == 1) {
            ((void (*)()) ev.data.ptr)();
        }
    }
可以看到action的执行,是通过ExecuteOneCommand的调用的,往上找,很容易找到是ActionManager的ExecuteOneCommand,进去看
void ActionManager::ExecuteOneCommand() {
    while (current_executing_actions_.empty() && !trigger_queue_.empty()) {
        //遍历 actions_
        for (const auto& action : actions_) {
            if (trigger_queue_.front()->CheckTriggers(*action)) {
                //将 action 加入到 current_executing_actions_ 中
                current_executing_actions_.emplace(action.get());
            }
        }
        trigger_queue_.pop();
    }

    ...

    //每次只执行一个 action,下次 init 进程 while 循环时,跳过上面的 while 循环,接着执行
    auto action = current_executing_actions_.front();

    if (current_command_ == 0) {
        std::string trigger_name = action->BuildTriggersString();
        INFO("processing action (%s)\n", trigger_name.c_str());
    }

    //执行 action 的 command
    action->ExecuteOneCommand(current_command_);

    ++current_command_;
    ...
}

void Action::ExecuteOneCommand(std::size_t command) const {
  //执行 action 对象中保存的 command
    ExecuteCommand(commands_[command]);
}

void Action::ExecuteCommand(const Command& command) const {
    Timer t;
  //调用 command 对应的处理函数
    int result = command.InvokeFunc();

    ...
}
小小总结一下
- init进入无限循环
- 按照ActionManager的actions_保存的顺序对每个Action进行处理
4.2.2.4 zygote如何启动
好,现在基本上了解了AIL,如何解析启动zygote所在的init.rc,init.rc中的command如何运行
通识的东西基本上大差不差,接下来要去看看如何启动zygote(感觉前面有点啰嗦)
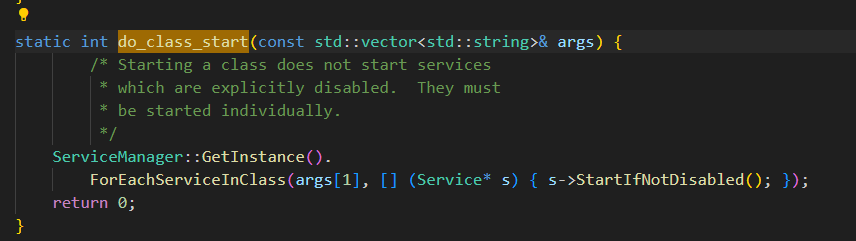
还记得之前我说很重要的这个函数吧
static int do_class_start(const std::vector<std::string>& args) {
    ServiceManager::GetInstance().
        ForEachServiceInClass(args[1], [] (Service* s) { s->StartIfNotDisabled(); });
    return 0;
}
里面调用service的StartIfNotDisabled
bool Service::StartIfNotDisabled() {
    if (!(flags_ & SVC_DISABLED)) {
        return Start();
    } else {
        flags_ |= SVC_DISABLED_START;
    }
    return true;
}

bool Service::Start() {
    ....
   //创建子进程
    pid_t pid = fork();
    if (pid == 0) {
        ...
       //执行对应 service 对应的执行文件,args_[0].c_str() 就是执行路径
        if (execve(args_[0].c_str(), (char**) &strs[0], (char**) ENV) < 0) {
            ERROR("cannot execve('%s'): %s\n", args_[0].c_str(), strerror(errno));
        }

        _exit(127);
    }

    ....
    return true;
}
可以看到又调用了Service 的 Start 函数
代码里的是class-start main
我们看到,里面class的标识就是main

好了,做一下总结
init.cpp做了一些command的初始化,并且在解释器里面把init.rc读入让设备看懂init的初始化配置,然后再在init.cpp里面无限循环中调用init.rc当中的command,其中就包括了zygote的启动
4.3总结
init主要工作
- 创建一些文件夹 挂载文件 挂载设备
- 初始化和启动属性服务
- 通过解析init.rc 和 其他对应rc文件,启动对应的系统级进程。其中包括后面要讲的zygote
接下来逻辑进入到zygote
5 zygote
到我手上这个pixel3的android10版本是有俩zygote的 分别是两个不同版本

进入到zygote,其实是先进入native层的zygote
5.1 native层的zygote
首先根据设备的信息启动不同类型的zygote(位数),我以64 32为例
可以看到二进制文件是app_process64和app_process32,-Xzygote /system/bin –zygote –start-system-server –socket-name=zygote都是他的参数
service zygote /system/bin/app_process64 -Xzygote /system/bin --zygote --start-system-server --socket-name=zygote
    class main
    socket zygote stream 660 root system
    onrestart write /sys/android_power/request_state wake
    onrestart write /sys/power/state on
    onrestart restart audioserver
    onrestart restart cameraserver
    onrestart restart media
    onrestart restart netd
    writepid /dev/cpuset/foreground/tasks /sys/fs/cgroup/stune/foreground/tasks

service zygote_secondary /system/bin/app_process32 -Xzygote /system/bin --zygote --socket-name=zygote_secondary
    class main
    socket zygote_secondary stream 660 root system
    onrestart restart zygote
    writepid /dev/cpuset/foreground/tasks /dev/stune/foreground/tasks
上面这个app_process64和app_process32都被编译完了,我们找到他的源代码看逻辑
代码比较长,我们主要关注三部分
- 创建app运行时对象
- 关键代码1
- 关键代码2
- 关键代码2的runtime.start
int main(int argc, char* const argv[])
{
    if (prctl(PR_SET_NO_NEW_PRIVS, 1, 0, 0, 0) < 0) {
        // Older kernels don't understand PR_SET_NO_NEW_PRIVS and return
        // EINVAL. Don't die on such kernels.
        if (errno != EINVAL) {
            LOG_ALWAYS_FATAL("PR_SET_NO_NEW_PRIVS failed: %s", strerror(errno));
            return 12;
        }
    }
创建app运行时对象
    AppRuntime runtime(argv[0], computeArgBlockSize(argc, argv));
    // Process command line arguments
    // ignore argv[0]
    argc--;
    argv++;

    // Everything up to '--' or first non '-' arg goes to the vm.
    //
    // The first argument after the VM args is the "parent dir", which
    // is currently unused.
    //
    // After the parent dir, we expect one or more the following internal
    // arguments :
    //
    // --zygote : Start in zygote mode
    // --start-system-server : Start the system server.
    // --application : Start in application (stand alone, non zygote) mode.
    // --nice-name : The nice name for this process.
    //
    // For non zygote starts, these arguments will be followed by
    // the main class name. All remaining arguments are passed to
    // the main method of this class.
    //
    // For zygote starts, all remaining arguments are passed to the zygote.
    // main function.
    //
    // Note that we must copy argument string values since we will rewrite the
    // entire argument block when we apply the nice name to argv0.

    int i;
    for (i = 0; i < argc; i++) {
        if (argv[i][0] != '-') {
            break;
        }
        if (argv[i][1] == '-' && argv[i][2] == 0) {
            ++i; // Skip --.
            break;
        }
        runtime.addOption(strdup(argv[i]));
    }

    // Parse runtime arguments.  Stop at first unrecognized option.
    bool zygote = false;
    bool startSystemServer = false;
    bool application = false;
    String8 niceName;
    String8 className;
关键代码1
    ++i;  // Skip unused "parent dir" argument.
    while (i < argc) {
        const char* arg = argv[i++];
        if (strcmp(arg, "--zygote") == 0) {
            zygote = true;
            niceName = ZYGOTE_NICE_NAME;
        } else if (strcmp(arg, "--start-system-server") == 0) {
            startSystemServer = true;
        } else if (strcmp(arg, "--application") == 0) {
            application = true;
        } else if (strncmp(arg, "--nice-name=", 12) == 0) {
            niceName.setTo(arg + 12);
        } else if (strncmp(arg, "--", 2) != 0) {
            className.setTo(arg);
            break;
        } else {
            --i;
            break;
        }
    }

    Vector<String8> args;
    if (!className.isEmpty()) {
        // We're not in zygote mode, the only argument we need to pass
        // to RuntimeInit is the application argument.
        //
        // The Remainder of args get passed to startup class main(). Make
        // copies of them before we overwrite them with the process name.
        args.add(application ? String8("application") : String8("tool"));
        runtime.setClassNameAndArgs(className, argc - i, argv + i);
    } else {
        // We're in zygote mode.
        maybeCreateDalvikCache();

        if (startSystemServer) {
            args.add(String8("start-system-server"));
        }

        char prop[PROP_VALUE_MAX];
        if (property_get(ABI_LIST_PROPERTY, prop, NULL) == 0) {
            LOG_ALWAYS_FATAL("app_process: Unable to determine ABI list from property %s.",
                ABI_LIST_PROPERTY);
            return 11;
        }

        String8 abiFlag("--abi-list=");
        abiFlag.append(prop);
        args.add(abiFlag);

        // In zygote mode, pass all remaining arguments to the zygote
        // main() method.
        for (; i < argc; ++i) {
            args.add(String8(argv[i]));
        }
    }

    if (!niceName.isEmpty()) {
        runtime.setArgv0(niceName.string());
        set_process_name(niceName.string());
    }
关键代码2
    if (zygote) {
        runtime.start("com.android.internal.os.ZygoteInit", args, zygote);
    } else if (className) {
        runtime.start("com.android.internal.os.RuntimeInit", args, zygote);
    } else {
        fprintf(stderr, "Error: no class name or --zygote supplied.\n");
        app_usage();
        LOG_ALWAYS_FATAL("app_process: no class name or --zygote supplied.");
        return 10;
    }
}
5.1.1关键代码1
可以看到里面如–start-system-server是我们的参数-Xzygote /system/bin –zygote –start-system-server当中的一部分
他会进行标志位的设置
关键代码1
    ++i;  // Skip unused "parent dir" argument.
    while (i < argc) {
        const char* arg = argv[i++];
        if (strcmp(arg, "--zygote") == 0) {
            zygote = true;
            niceName = ZYGOTE_NICE_NAME;
        } else if (strcmp(arg, "--start-system-server") == 0) {
            startSystemServer = true;
        } else if (strcmp(arg, "--application") == 0) {
            application = true;
        } else if (strncmp(arg, "--nice-name=", 12) == 0) {
            niceName.setTo(arg + 12);
        } else if (strncmp(arg, "--", 2) != 0) {
            className.setTo(arg);
            break;
        } else {
            --i;
            break;
        }
    }
5.1.2关键代码2
上面根据我们的参数知道以zygote参数启动这个app_process,里面zygote被设置为true,那么就会进入下面这个判断中,特别别是runtime.start(“com.android.internal.os.ZygoteInit”, args, zygote);
if (zygote) {
        runtime.start("com.android.internal.os.ZygoteInit", args, zygote);
    } else if (className) {
        runtime.start("com.android.internal.os.RuntimeInit", args, zygote);
    } else {
        fprintf(stderr, "Error: no class name or --zygote supplied.\n");
        app_usage();
        LOG_ALWAYS_FATAL("app_process: no class name or --zygote supplied.");
        return 10;
    }
5.1.3关键代码2的runtime.start
这玩意就很长了 我先贴出来
void AndroidRuntime::start(const char* className, const Vector<String8>& options, bool zygote)
{
    ALOGD(">>>>>> START %s uid %d <<<<<<\n",
            className != NULL ? className : "(unknown)", getuid());

    static const String8 startSystemServer("start-system-server");

    /*
     * 'startSystemServer == true' means runtime is obsolete and not run from
     * init.rc anymore, so we print out the boot start event here.
     */
    for (size_t i = 0; i < options.size(); ++i) {
        if (options[i] == startSystemServer) {
           /* track our progress through the boot sequence */
           const int LOG_BOOT_PROGRESS_START = 3000;
           LOG_EVENT_LONG(LOG_BOOT_PROGRESS_START,  ns2ms(systemTime(SYSTEM_TIME_MONOTONIC)));
        }
    }

    const char* rootDir = getenv("ANDROID_ROOT");
    if (rootDir == NULL) {
        rootDir = "/system";
        if (!hasDir("/system")) {
            LOG_FATAL("No root directory specified, and /android does not exist.");
            return;
        }
        setenv("ANDROID_ROOT", rootDir, 1);
    }

    //const char* kernelHack = getenv("LD_ASSUME_KERNEL");
    //ALOGD("Found LD_ASSUME_KERNEL='%s'\n", kernelHack);

    /* start the virtual machine */
    JniInvocation jni_invocation;
    jni_invocation.Init(NULL);
    JNIEnv* env;
    if (startVm(&mJavaVM, &env, zygote) != 0) {
        return;
    }
    onVmCreated(env);

    /*
     * Register android functions.
     */
    if (startReg(env) < 0) {
        ALOGE("Unable to register all android natives\n");
        return;
    }

    /*
     * We want to call main() with a String array with arguments in it.
     * At present we have two arguments, the class name and an option string.
     * Create an array to hold them.
     */
    jclass stringClass;
    jobjectArray strArray;
    jstring classNameStr;

    stringClass = env->FindClass("java/lang/String");
    assert(stringClass != NULL);
    strArray = env->NewObjectArray(options.size() + 1, stringClass, NULL);
    assert(strArray != NULL);
    classNameStr = env->NewStringUTF(className);
    assert(classNameStr != NULL);
    env->SetObjectArrayElement(strArray, 0, classNameStr);

    for (size_t i = 0; i < options.size(); ++i) {
        jstring optionsStr = env->NewStringUTF(options.itemAt(i).string());
        assert(optionsStr != NULL);
        env->SetObjectArrayElement(strArray, i + 1, optionsStr);
    }

    /*
     * Start VM.  This thread becomes the main thread of the VM, and will
     * not return until the VM exits.
     */
    char* slashClassName = toSlashClassName(className);
    jclass startClass = env->FindClass(slashClassName);
    if (startClass == NULL) {
        ALOGE("JavaVM unable to locate class '%s'\n", slashClassName);
        /* keep going */
    } else {
        jmethodID startMeth = env->GetStaticMethodID(startClass, "main",
            "([Ljava/lang/String;)V");
        if (startMeth == NULL) {
            ALOGE("JavaVM unable to find main() in '%s'\n", className);
            /* keep going */
        } else {
            env->CallStaticVoidMethod(startClass, startMeth, strArray);

#if 0
            if (env->ExceptionCheck())
                threadExitUncaughtException(env);
#endif
        }
    }
    free(slashClassName);

    ALOGD("Shutting down VM\n");
    if (mJavaVM->DetachCurrentThread() != JNI_OK)
        ALOGW("Warning: unable to detach main thread\n");
    if (mJavaVM->DestroyJavaVM() != 0)
        ALOGW("Warning: VM did not shut down cleanly\n");
}
里面这两处对理解Android系统还是有很大帮助的,,startVM更是理解虚拟机的入口,标记一下,startreg是用来注册JNI的
     startVm(&mJavaVM, &env, zygote)

     startReg(env)
然后就到这里 作用是 找到ZygoteInit的main函数,然后通过JNI调用(写法很熟悉了),进入到zygote的Java层
     jmethodID startMeth = env->GetStaticMethodID(startClass, "main",
     "([Ljava/lang/String;)V”);
     env->CallStaticVoidMethod(startClass, startMeth, strArray);
5.2 java层的zygote
如上 ZygoteInit.java.main方法
先上代码
public static void main(String argv[]) {
        // Mark zygote start. This ensures that thread creation will throw
        // an error.
        ZygoteHooks.startZygoteNoThreadCreation();

        try {
            Trace.traceBegin(Trace.TRACE_TAG_DALVIK, "ZygoteInit");
            RuntimeInit.enableDdms();
            // Start profiling the zygote initialization.
            SamplingProfilerIntegration.start();

            boolean startSystemServer = false;
            String socketName = "zygote";
            String abiList = null;
            for (int i = 1; i < argv.length; i++) {
                if ("start-system-server".equals(argv[i])) {
                    startSystemServer = true;
                } else if (argv[i].startsWith(ABI_LIST_ARG)) {
                    abiList = argv[i].substring(ABI_LIST_ARG.length());
                } else if (argv[i].startsWith(SOCKET_NAME_ARG)) {
                    socketName = argv[i].substring(SOCKET_NAME_ARG.length());
                } else {
                    throw new RuntimeException("Unknown command line argument: " + argv[i]);
                }
            }

            if (abiList == null) {
                throw new RuntimeException("No ABI list supplied.");
            }

            registerZygoteSocket(socketName);
            Trace.traceBegin(Trace.TRACE_TAG_DALVIK, "ZygotePreload");
            EventLog.writeEvent(LOG_BOOT_PROGRESS_PRELOAD_START,
                SystemClock.uptimeMillis());
            preload();
            EventLog.writeEvent(LOG_BOOT_PROGRESS_PRELOAD_END,
                SystemClock.uptimeMillis());
            Trace.traceEnd(Trace.TRACE_TAG_DALVIK);

            // Finish profiling the zygote initialization.
            SamplingProfilerIntegration.writeZygoteSnapshot();

            // Do an initial gc to clean up after startup
            Trace.traceBegin(Trace.TRACE_TAG_DALVIK, "PostZygoteInitGC");
            gcAndFinalize();
            Trace.traceEnd(Trace.TRACE_TAG_DALVIK);

            Trace.traceEnd(Trace.TRACE_TAG_DALVIK);

            // Disable tracing so that forked processes do not inherit stale tracing tags from
            // Zygote.
            Trace.setTracingEnabled(false);

            // Zygote process unmounts root storage spaces.
            Zygote.nativeUnmountStorageOnInit();

            ZygoteHooks.stopZygoteNoThreadCreation();

            if (startSystemServer) {
                startSystemServer(abiList, socketName);
            }

            Log.i(TAG, "Accepting command socket connections");
            runSelectLoop(abiList);

            closeServerSocket();
        } catch (MethodAndArgsCaller caller) {
            caller.run();
        } catch (RuntimeException ex) {
            Log.e(TAG, "Zygote died with exception", ex);
            closeServerSocket();
            throw ex;
        }
    }
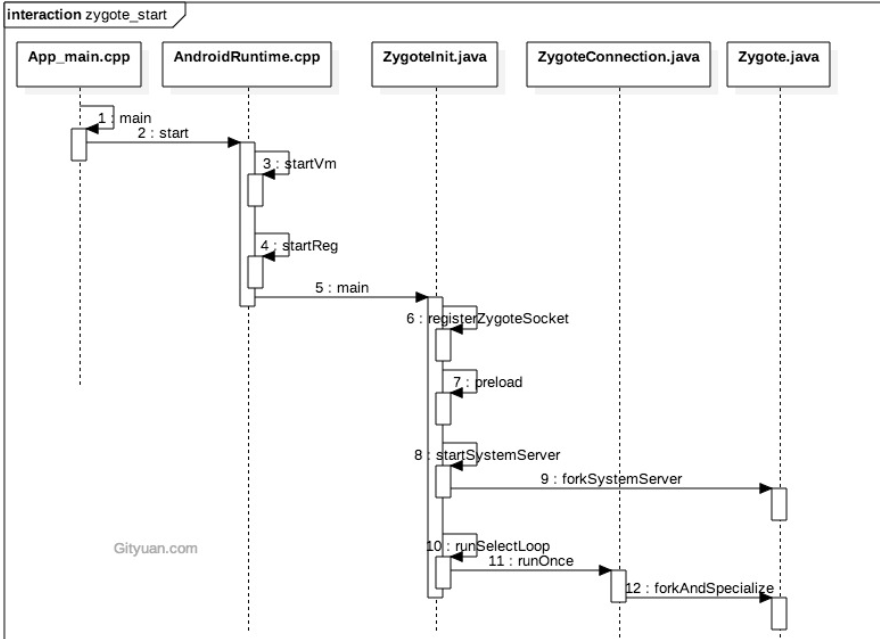
里面几个重要函数
registerZygoteSocket(socketName);
注册zygote用的socket用来和AMS进行通信,用来创建新的应用进程

preload();
预加载的资源、类、虚拟机实例等

startSystemServer(abiList, socketName);
启动SystemServer进程,就有之前学过的PMS这些

runSelectLoop(abiList);
循环等待并处理AMS发送来的创建新应用进程请求。如果收到创建应用程序的请求,则调用ZygoteConnection的runOnce函数来创建一个新的应用程序进程
上个时序图
5.3 总结
解析rc的参数
- 在native层调用运行时的start方法,里面又创建虚拟机和注册JNI函数
- 通过JNI方式调用ZygoteInit的main函数,进入到java层
-
registerZygoteSocket注册zygote用的socket用来和AMS进行通信,用来创建新的应用进程
-
preload预加载的资源、类、虚拟机实例等
-
startSystemServer启动SystemServer进程,就有之前学过的PMS这些
- runSelectLoop循环等待并处理AMS发送来的创建新应用进程请求。
- 到这里zygote就差不多干完初始化的活了,开始等待
6 Systemserver
刚刚学到Zygote启动了SyetemServer
我们先上一个时序图
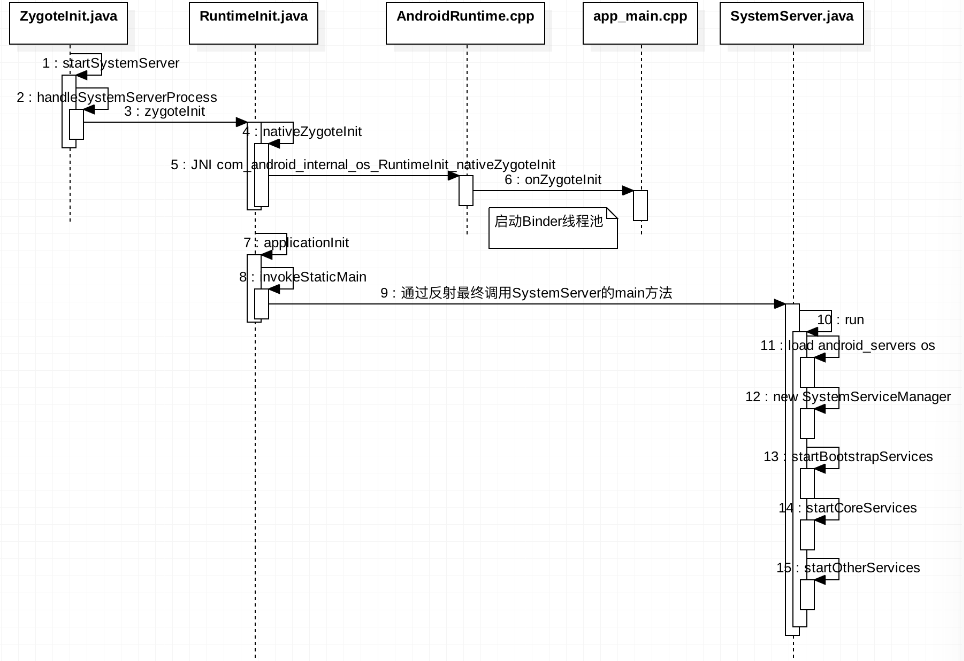
这一块我经理就稍微少一点,也是偷的别的师傅的分析,有个概念先
ZygoteInit.startSystemServer()
fork 子进程 system_server,进入 system_server 进程。
ZygoteInit.handleSystemServerProcess()
设置当前进程名为“system_server”,创建 PathClassLoader 类加载器。
RuntimeInit.zygoteInit()
重定向 log 输出,通用的初始化(设置默认异常捕捉方法,时区等),初始化 Zygote -> nativeZygoteInit()
app_main::onZygoteInit()
proc->startThreadPool(); 启动Binder线程池,这样就可以与其他进程进行通信。
ZygoteInit.main()
开启 DDMS 功能,preload() 加载资源,预加载OpenGL,调用 SystemServer.main() 方法
SystemServer.main()
先初始化 SystemServer 对象,再调用对象的 run() 方法。
到下面这里,就比较熟悉了
SystemServer.run()
          createSystemContext
          startBootstrapServices();
          startCoreServices();
          startOtherServices();
          Looper.loop();
6.1系统服务
startBootstrapServices:引导服务
| 服务 | 作用 |
|---|---|
| Installer | 系统安装apk时的一个服务类,启动完成Installer服务之后才能启动其他的系统服务 |
| ActivityManagerService | 负责四大组件的启动、切换、调度。 |
| PowerManagerService | 计算系统中和Power相关的计算,然后决策系统应该如何反应 |
| LightsService | 管理和显示背光LED |
| DisplayManagerService | 用来管理所有显示设备 |
| UserManagerService | 多用户模式管理 |
| SensorService | 为系统提供各种感应器服务 |
| PackageManagerService | 用来对apk进行安装、解析、删除、卸载等等操作 |
startCoreServices:核心服务
| 服务 | 作用 |
|---|---|
| BatteryService | 管理电池相关的服务 |
| UsageStatsService | 收集用户使用每一个APP的频率、使用时常 |
| WebViewUpdateService | WebView更新服务 |
startOtherServices:其他服务(60多种)
| 服务 | 作用 |
|---|---|
| CameraService | 摄像头相关服务 |
| AlarmManagerService | 全局定时器管理服务 |
| InputManagerService | 管理输入事件 |
| WindowManagerService | 窗口管理服务 |
| VrManagerService | VR模式管理服务 |
| BluetoothService | 蓝牙管理服务 |
| NotificationManagerService | 通知管理服务 |
| DeviceStorageMonitorService | 存储相关管理服务 |
| LocationManagerService | 定位管理服务 |
| AudioService | 音频相关管理服务 |
| … |
都是一些Android必要的服务
6.2 总结
- 启动Binder线程池,这样就可以与其他进程进行通信。
- 创建SystemServiceManager,其用于对系统服务进程创建、启动和生命周期管理。
- 启动各种系统服务(引导服务、核心服务、其他服务)。
7 Launcher
可能写的有点突然,这个Launcher其实是由SystemServer启动的AMS启动的。这个Launcher的作用就是来显示 已经安装的应用程序,Lanucher在启动过程中会请求PackageManagerService返回系统中已经安装的应用程序信息,并将这些信息封装成一个快捷图标列表显示在系统屏幕上。
代码逻辑弯弯绕绕,非常长,这里仅作系统启动学习,就不写那么多了,详情可以去看这个师傅的博客
https://blog.csdn.net/fdsafwagdagadg6576/article/details/116333916
这边只做总结
7.1 Launcher启动过程
- SystemServer启动PMS,PMS启动后会先安装好系统应用程序,在此前成功启动的AMS将Launcher给启动,在AMS的systemReady方法出启动。是在startOtherServices被调用的。
- systemReady方法中最终是通过Intent进行启动的,其中action为:Intent.ACTION_MAIN、Category为Intent.CATEGORY_HOME。启动方法与普通的activity方式类似。
7.2 Launcher应用图表显示过程
- 首先加载所有应用信息是在内部创建了一个HandlerThread,然后通过handler循环调用来加载所以应用的。然后把allApps信息传递给一个AllAppsRecyclerView控件的adapter来进行展示的。
- Launcher是用工作区的形式来显示系统安装的应用程序的快捷图标的,每一个工作区都是用来描述一个抽象桌面的,它由n个屏幕组成,每个屏幕又分为n个单元格,每个单元格用来显示一个应用程序的快捷图标。